The Set PIN widget allows your customers to set or change their card PIN by entering and confirming a new PIN.
Set PIN

Step 1: Load the Widget Script

Load the Set PIN widget script into your page:
<script
  type="module"
  src="https://assets.synctera.com/widgets/set-pin/v1.1.1/index.js"
></script>

Step 2: Get a Widget Token

Request a widget token for setting the PIN:
curl -X GET "https://api.synctera.com/v2/cards/{card_id}/widget_token?widget_type=SET_PIN" \
  -H "Authorization: Bearer {apiKey}" \
  -H "Content-Type: application/json"
Widget tokens expire after 5 minutes and are scoped to a specific card. Generate a new token on each page load or when the user initiates a new PIN change.

Step 3: Add the Widget Component

Add the <set-pin> web component to your page:
<set-pin
  token="your-widget-token"
  env="production"
></set-pin>

Configuration Options
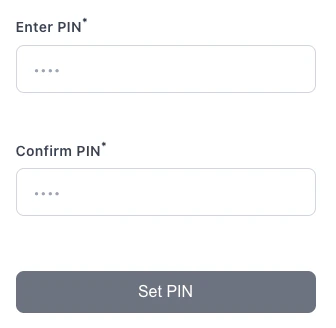
PropertyTypeRequiredDefaultDescription
tokenstringYes-Widget token obtained from the API
envstringYes-Environment: sandbox or production
themestringNo"default"Theme preset: "default" or "night-shift"
stylesstringNo{}JSON string of design tokens for visual customization
custom-labelsstringNo{}JSON string of custom labels for form fields

Custom Labels

Customize the labels displayed in the widget:
<set-pin
  token="your-token"
  env="production"
  custom-labels='{
    "widgetTitle": "Create Your PIN",
    "pinLabel": "Enter PIN",
    "confirmPinLabel": "Confirm PIN",
    "submitButtonText": "Set PIN",
    "submitLoadingText": "Setting PIN..."
  }'
></set-pin>
Available custom label keys:
  • widgetTitle - Widget header text
  • pinLabel - PIN field label
  • confirmPinLabel - Confirm PIN field label
  • pinPlaceholder - PIN field placeholder
  • confirmPinPlaceholder - Confirm PIN placeholder
  • submitButtonText - Submit button text
  • submitLoadingText - Loading state text

Event Handling

The widget dispatches lifecycle events across two phases:
PhaseEventsDescription
Initializationload or error (mutually exclusive)Fires once when the widget first renders and its secure input fields load (or fail to load).
Submissionsuccess or failureFires after the user submits the form.
  • load — Widget initialized successfully, all fields are ready for user input.
  • error — Widget failed to initialize (field load failure, network error, or timeout).
  • success — PIN was set successfully.
  • failure — PIN setting failed (PINs do not match, expired widget token, or API error).
error fires only during widget initialization (e.g., a secure input field failed to load). If the widget loads successfully but the user’s submission fails — mismatched PINs, expired token — that triggers failure, not error.
You can listen for events using either addEventListener or callback properties:
EventaddEventListenerCallback property
Initialization successwidget.addEventListener('load', fn)widget.onLoad = fn
Initialization failurewidget.addEventListener('error', fn)widget.onError = fn
Submission successwidget.addEventListener('success', fn)widget.onSuccess = fn
Submission failurewidget.addEventListener('failure', fn)widget.onFailure = fn

Load Event

Dispatched when all secure input fields have loaded and the widget is fully functional. Use it to hide loading UI or enable dependent controls.
PropertyTypeDescription
instanceIdstringUnique ID for this widget instance
<set-pin id="setpin-widget" token="your-token" env="production"></set-pin>
<script>
  document.getElementById('setpin-widget').addEventListener('load', (event) => {
    const { instanceId } = event.detail;
    console.log('Widget ready', instanceId);
  });
</script>

Error Event

Dispatched when the widget fails to initialize. This means one or more secure input fields could not load, and the widget is not functional. Show an error message or retry UI to the user.
PropertyTypeDescription
instanceIdstringUnique ID for this widget instance
errorstringHuman-readable error message (safe to display)
failedFieldsstring[]List of field types that failed to load
<script>
  document.getElementById('setpin-widget').addEventListener('error', (event) => {
    const { error, failedFields } = event.detail;
    console.error('Widget initialization failed:', error, failedFields);
    // Show error UI or offer a retry button
  });
</script>
The load and error events are mutually exclusive — exactly one will fire during widget initialization. Always listen for both to handle all scenarios.

Success and Failure Events

Dispatched after the user submits the PIN form. Common failure reasons include mismatched PINs and expired widget token. The success event exposes only non-sensitive status metadata:
PropertyTypeDescription
statusstringSubmission status returned by the widget
messagestringOptional human-readable success message
instanceIdstringUnique ID for this widget instance
PIN values are never included in host-page event details.
<set-pin
  id="setpin-widget"
  token="your-token"
  env="production"
></set-pin>

<script>
  const widget = document.getElementById('setpin-widget');

  widget.addEventListener('success', (event) => {
    const { status, message } = event.detail;
    console.log('PIN set successfully:', status, message);
    // Handle success - redirect or update UI
  });

  widget.addEventListener('failure', (event) => {
    console.error('Setting PIN failed:', event.detail.error);
    // Handle failure - display message to user
  });
</script>

Complete Example

<!DOCTYPE html>
<html lang="en">
  <head>
    <meta charset="utf-8" />
    <title>Set Card PIN</title>
    <script
      type="module"
      src="https://assets.synctera.com/widgets/set-pin/v1.1.1/index.js"
    ></script>
  </head>
  <body>
    <h1>Set Your Card PIN</h1>

    <div id="error-message" style="color: red; display: none;"></div>

    <set-pin
      id="setpin-widget"
      env="production"
    ></set-pin>

    <script>
      async function initializeWidget() {
        try {
          // Fetch widget token from your backend
          const response = await fetch('/api/card-widget-token', {
            method: 'POST',
            headers: { 'Content-Type': 'application/json' },
            body: JSON.stringify({
              card_id: 'your-card-id',
              widget_type: 'SET_PIN'
            })
          });

          const { widget_token } = await response.json();

          // Set token on widget
          const widget = document.getElementById('setpin-widget');
          widget.setAttribute('token', widget_token);

          // Set up event listeners
          widget.addEventListener('load', (event) => {
            console.log('Widget ready:', event.detail.instanceId);
          });

          widget.addEventListener('error', (event) => {
            const { error, failedFields, instanceId } = event.detail;
            console.error('Widget failed to initialize:', error, failedFields, instanceId);
            document.getElementById('error-message').textContent = error;
            document.getElementById('error-message').style.display = 'block';
          });

          widget.addEventListener('success', (event) => {
            const { status, message } = event.detail;
            console.log('PIN set:', status, message);
            alert('PIN set successfully!');
          });

          widget.addEventListener('failure', (event) => {
            document.getElementById('error-message').textContent = event.detail.error;
            document.getElementById('error-message').style.display = 'block';
          });

        } catch (error) {
          console.error('Failed to initialize widget:', error);
        }
      }

      window.addEventListener('DOMContentLoaded', initializeWidget);
    </script>
  </body>
</html>